skip to Main Content

Fixing My Broken AutoCrat

I am awful about keeping up with what becomes deprecated by Google (DocsList is now gone and DriveApp must be used instead). Today, some of our district workflow threw errors because we are still using AutoCrat v4.5.5 (4/12/14). I will update over the summer, but for right now, I just wanted to get this installation of the script working. I headed over to the Google Group for Apps Script Issues and found the answer. I am sharing here in hopes it may save you all some searching.

First, make a copy of your sheet (just in case).

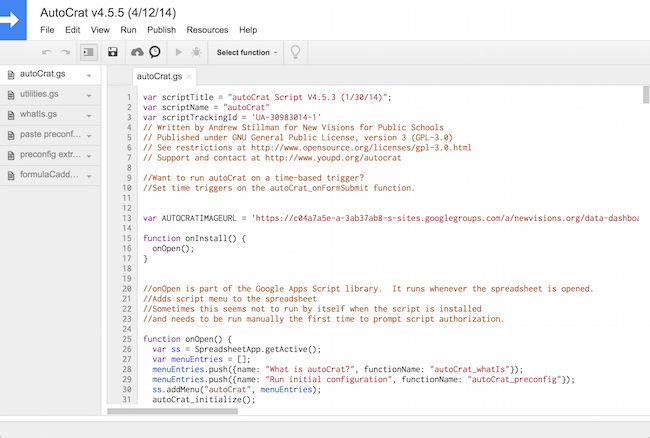
If you need help finding out if you are using the same version of AutoCrat as we are, here is how to find that AND how to get to the Script Editor.

version-autocrat-2Click image to view larger version in a new window.
 

In order to fix the script, you are going to be making changes to the code. PROCEED AT YOUR OWN RISK!

Click on the link to AutoCrat in your Script Editor window. It will look like this. Note: the left sidebar lists all the files it takes for AutoCrat to work its magic. 

AutoCrat 1

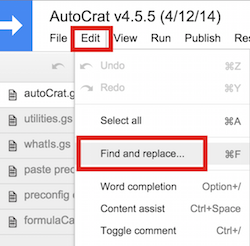
The Script Editor has a Find & Replace feature which can be found under the Edit menu. NOTE: I get a little nervous doing mass Find & Replace so I used the Find and then made the changes manually.

Find

Here are all the things you need to fix:

  • Replace all instances of docsList with DriveApp
  • Replace all instances (with quotes) of “document” and “DOCUMENT” with MimeType.GOOGLE_DOCS (no quotes)
  • Replace all instances of getFileType with getMimeType
  • Replace all instances of file.addToFolder(folder) with folder.addFile(file) – NOTE: Instead of having the word folder inside the parentheses, I had secondaryFolder so look for that one as well.
  • Replace all instances of file.removeFromFolder(DriveApp.getRootFolder()) to DriveApp.removeFile(file);
  • Replace all instances of pdfFile.removeFromFolder(DriveApp.getRootFolder()) to DriveApp.removeFile(pdfFile);

Save the changes in the Script Editor and try running your AutoCrat merge again.

This worked for me. I hope it works for you as well.

Introduction to Screencasting

I put this module together for one of my graduate school classes and am sharing it here in case it can be helpful for anyone else. I intend to share with the teachers at my school as a flipped element for a PD session on creating screencasts. Not only does it have helpful info about screencasting but it also includes some Visible Thinking routines AND shows how you can push Google Sites a bit.

GO TO:

Introduction to Screencasting

Intro to Screencasting

Google Scholar Button for Chrome

I’ve been spending lots of time in Google Scholar since I began work on my EdD last August. Today, I spotted a new extension for Google Chrome, the Google Scholar Button.

From the extension overview, when you click the Scholar button, you can:

  • Find full text on the web or in your university library. Select the title of the paper on the page you’re reading, and click the Scholar button to find it.
  • Transfer your query from web search to Scholar. Press the Scholar button to see top three results; click “full screen” in the lower left of the popup to see them all.
  • Format references in widely used citation styles. Press the quote button in the popup to see a formatted reference and copy it into the paper you’re writing.

Library links work best when you’re on your campus but you can configure them for off-campus use by visiting Google Scholar Settings. You can even search the US case law by clicking the gear icon at the bottom of the popup, and configure your preferred collection in Google Scholar Settings.

I’m looking forward to the time this handy extension will save me as I complete my degree!

Google Scholar Button

How Symbaloo Made My Year Better

I don’t even want to think about what this, my first year at my school, would have been like without Symbaloo. Last summer, I set all the student computers to start up to a specific page on our district server and that page holds an embedded Symbaloo mix.

The main mix we use is here – http://www.symbaloo.com/mix/lessymbaloo1 – but we embed it into our own HTML page to make it look like this – http://lakelandk12.org/les/start.html.

LES Symbaloo
 

When we need to add a link to a computer, I add it to the Symbaloo and sync it. Job done.

I added grade-level tiles that link to grade-level mixes (also embedded in our own HTML pages) and those are managed by teachers in that grade-level. While that part hasn’t really taken off this year, I expect it will next year because we are going to be moving much of the “practice games” off the main Symbaloo as we add some structure to the computer lab rotation.

FYI – We have a link to it on the school website so students and parents can easily access from home as well.

If you have to manage links on lots of computers, consider moving to this kind of setup. It sure has made my year better!


News

Free EdTech Goodies for You and You and You!

Once a month I assemble and distribute a Technology Newsletter to the teachers at my school. I shared the recent edition on Twitter, Google+, and Facebook and it was so well-received that I’ve decided to post them on this blog as well. Some have been edited to remove school-specific login information but most are exactly the same.

All the newsletters are posted on a page under the Resources menu on the navigation bar of this site. I hope you find these, and the information they contain, helpful.


Newsletters
 

Make Your Own Animated GIF Tutorials

I’m a big fan of SnagIt for Chrome (extension with app) for many reasons. One of which is the ability to record up to 20 seconds of video and save it as an animated GIF directly into my Google Drive while immediately getting a short URL to share. However, sometimes what I need to record is not inside of Chrome or it takes me longer than 20 seconds to perform the steps.

If you are in the same boat, give LICEcap a look. It is a free download and is available for Mac and Windows. I will still use SnagIt when on my Chromebook but, when I’m on my Mac, I expect to make use of this handy application.

Crank up LICEcap and you will see a screen capture frame that can be resized to desired dimensions. Click the record button on the bottom of the frame and start working. You can move the frame around even while recording but I suggest you first use the handy-dandy pause button to avoid including the screen capture frame in the GIF.

handy
The ability to pause, record in any application, record an area rather than an entire window, and move the recording area around make LICEcap a tool to have in your tech toolkit.

Bonus:

It’s settled: How to pronounce ‘GIF’

gif

Back To Top